Kodi subtitles become essential occasionally, especially when the sound quality is not good or when I must continue to keep the volume low to avoid causing disruption to others around. At night bring down the volume to the barely-audible degree and can’t do with no subtitles. Needless to say, when I’m watching a movie in a foreign language, I want my subtitles.
Well, these are my reasons to add subtitles to Kodi and seeing as you’re reading this guide, I’m assuming you’ve got your own. This is exactly why I have assembled this walkthrough to explain to you how you can get subtitles on Kodi. If you’re a person who would like to see subtitles in another language, this can also be achieved using the manual below. In this tutorial, we’ll use a free Kodi addon called OpenSubtitles.org.
Among the greatest features of OpenSubtitles.org is the ability to understand how other users have rated a specific subtitle before downloading it. You can quickly determine which subtitle will be ideal for your Kodi device simply by taking a look at the options within the download list.
Also read: How To Download JW Player Videos
Install subtitles addons on Kodi
1. Register for a free account at opensubtitles.org.
2. Click the Settings icon that looks like a gear.
3. Click Add-ons.
4. Click Install from the repository.
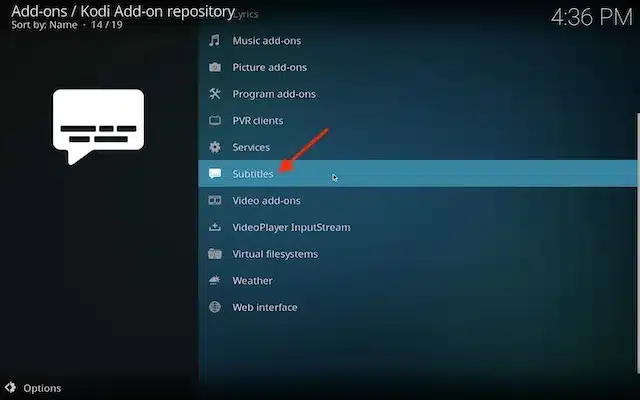
5. Click the Kodi Add-on repository.
6. Click Subtitles.
7. Click OpenSubtitles.org.
8. Click Install.
9. OpenSubtitles.org message will appear in the top-right corner of the screen once it has been installed.
10. Click OpenSubtitles.org item again.
11. Click Configure.
12. Enter the username and password from Step #1 above.

13. Click Player.

14. Hover over Language on left and then change your preferred subtitle language on right.
15. Click Default TV show service.

16. Click OpenSubtitles.org.

17. Click Default movie service.

18. Click OpenSubtitles.org.
19. Play your movie or TV show that you want subtitles for. Click the OK button on remote to open playback bar.
20. Click the subtitle icon in the bottom-right corner of the screen.
21. Click Download subtitle.
22. Click a subtitle file that has a good rating.
23. Subtitles should appear now on movies or TV show.
24. If subtitles are out of sync with the voice on the screen, go back into Subtitle icon.
25. First, download a new Subtitle file and try that. If unsuccessful, use the Subtitle offset to sync subtitles. Please see the video above for a detailed explanation of how this works.
Kodi Subtitle Setup is now complete!
Also read: How to Install Flixnet Kodi Addon
Install Subscene2 add-on

Subscene.com hosts a large catalog of subtitles, but the add-on in the official repository has been broken since the last update of the website. Luckily, there’s an unofficial add-on called Subscene2.
A. Go to the Home Screen and press the cog icon to open the System menu.
C. Press Add source.
D. Write https://thuongtin.com/kodi/subtitle/ on the top box and thuongtin on the bottom one. Press OK to continue.
E. Go back to the System Menu and select Add-ons.
F. Press Install from zip file.
G. Now click on service.subtitle.subscene2.zip and wait a couple of seconds until the add-on is downloaded and installed.
Now you’ll be able to download subtitles from Subscene. You can also install service.subtitle.thuongtin.zip, it combines results from OpenSubtitles and Subscene in a single add-on.
You can also check:
- Podnapisi
- XBMC Subtitles
- Addic7ed
- BSPlayer
- Subdivx
- Super Subtitles
- Divxplanet
Subtitles for kodi
Kodi is a popular media player that allows you to stream movies, TV shows, and other media content on your device. One of the key features of Kodi is its ability to support subtitles for a better viewing experience. Enabling automatic subtitles on Kodi can greatly enhance your media streaming experience.
Automatic subtitles on Kodi are a convenient way to enjoy your favorite movies and TV shows without the hassle of manually searching and downloading subtitles. With automatic subtitles, Kodi will automatically search and download the appropriate subtitles for your media content.
To enable automatic subtitles on Kodi, you will need to install a subtitle add-on. There are several subtitle add-ons available for Kodi, such as OpenSubtitles, Subscene, and Podnapisi. These add-ons allow Kodi to retrieve subtitles from their respective databases.
Once you have installed a subtitle add-on, you can enable automatic subtitles in Kodi settings. To do this, go to the Kodi home screen and navigate to Settings > Player Settings > Language. Under the Language section, you will find an option called “Default TV Show service” and “Default Movie service.” Select the subtitle add-on you installed from the list.
After enabling automatic subtitles on Kodi, whenever you play a movie or TV show, Kodi will automatically search for and download the appropriate subtitles. The subtitles will be displayed on the screen while you watch your media content, providing a seamless and enjoyable viewing experience.
Automatic subtitles kodi
Enabling automatic subtitles on Kodi can greatly enhance your viewing experience. With automatic subtitles, you can easily understand and follow along with the dialogue in your favorite movies and TV shows.
Kodi offers several addons that allow you to enable automatic subtitles. These addons work by searching online subtitle databases and automatically downloading the appropriate subtitles for the content you are watching.
One popular addon for automatic subtitles on Kodi is OpenSubtitles. To enable this addon, you first need to create an account on the OpenSubtitles website. Once you have an account, you can enter your login credentials in the addon settings on Kodi.
Another option for automatic subtitles on Kodi is the Subscene addon. This addon also requires you to create an account on the Subscene website and enter your login information in the addon settings. Once set up, the Subscene addon will automatically download subtitles for your content.
If you prefer a more customizable option, you can try the AutoSubs addon. This addon allows you to choose from a variety of subtitle sources and customize the language and appearance of the subtitles.
Enabling automatic subtitles on Kodi is a simple process that can greatly enhance your viewing experience. Whether you choose to use OpenSubtitles, Subscene, or AutoSubs, having automatic subtitles will make it easier to understand and enjoy your favorite movies and TV shows.