When it comes to creating functional checkboxes in Microsoft Word, there are a couple of methods at your disposal. Whether you need checkboxes for a printable task list or want to enable users to interact with checkboxes within the Word document itself, we’ve got you covered. In this comprehensive guide, we’ll walk you through two distinct approaches to achieve this: one for static checkboxes suitable for printing, and another for dynamic checkboxes that users can interact with while editing the document.
Method 1: Adding Static Checkboxes Using Bullets
If you require checkboxes primarily for a printable list of tasks, this method will do the trick. Although these checkboxes won’t be interactive, they are perfect for documents meant solely for printing.
- Begin by creating your list of items within a Word document.
- Select the entire list and navigate to the “Home” tab on the ribbon menu.
- In the “Paragraph” commands section, click on the drop-down arrow for “Bullets.”
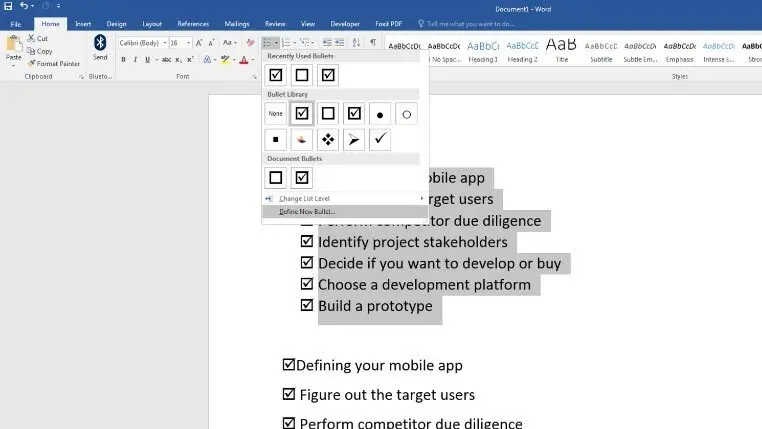
- Choose “Define New Bullet” from the menu.
- In the dialog box that appears, click on the “Symbol” option.
- Here, you can choose either a blank rectangle or a rectangle with a checkmark.
- Select “OK” to close the Symbol dialog box.
- Click “OK” again on the “Define New Bullet” window.
Congratulations! You’ve successfully added rectangle boxes or check-marked rectangles next to each task or item on your list.
Method 2: Creating Interactive Checkboxes Using Content Control
If you want checkboxes that users can interact with while editing the document, follow these steps:
- Open a Word file and populate it with your list of items.
- Click on the “File” tab and select “Options” from the left navigation pane.
- In the “Word Options” dialog box, choose “Customize Ribbon.”
- You’ll see two lists, one on the left and another on the right. In the right-side list, checkmark the box for “Developer.”
- Click “OK” to close the “Word Options” dialog box.
Now that you’ve added the “Developer” tab, proceed as follows:
- Place the cursor to the left of the first item on your list and click on the “Developer” tab.
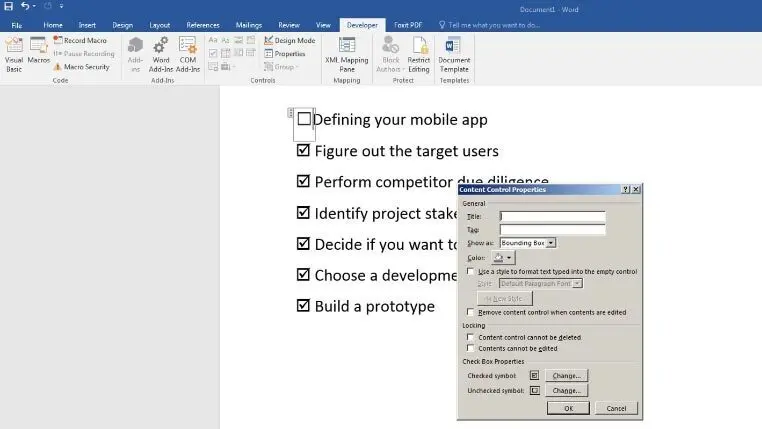
- In the “Controls” commands section, you’ll find a white rectangle with a blue checkmark. Click on it to add a checkbox next to the list item.
- Select the checkbox and click on “Properties” in the “Controls” commands section.
- The “Content Control Properties” window will appear, where you’ll find the “Checked symbol” option at the bottom.
- Click on “Change” next to the “Checked symbol.”
- In the Symbol dialog box, open the “Font” drop-down menu and select “Wingdings.”
- Scroll down to locate the checkmark box at the bottom of the Symbol window. Select it and press “OK” in all dialog boxes to apply the changes.
Word will replace the default X mark with the checkmark.
You can now copy the modified checkbox element from the first item to all the other items in your list to create interactive checkboxes throughout your document.

Adding Check Boxes on Windows
Step 1: Unveil the Developer Tab
The Developer tab, your gateway to check box integration, is not visible by default in Microsoft Word. To make it accessible, right-click anywhere within the ribbon, and select the “Customize the Ribbon” option from the context menu.
Step 2: Activate the Developer Tab
In the ensuing “Options” window, you’ll find a checkbox next to “Developer.” Ensure it is selected, then click “OK” to confirm.
Step 3: Create Your List
Now, proceed to type out the list to which you intend to add check boxes.
Step 4: Insert Check Boxes
Once your list is in place, position the cursor at the start of the first item. Head over to the Developer tab and, within the “Controls” group, locate the “Check Box Content Control” option. Click it.
A check box will materialize next to the selected item.
Step 5: Replicate Check Boxes
To populate your list with check boxes, simply copy and paste the initial check box to each respective item. For ease of use, you can toggle the status of each check box by clicking it with your mouse.
Adding Check Boxes on Mac
Step 1: Reveal the Developer Tab
Just like on Windows, the Developer tab needs to be unveiled on Mac. To achieve this, open the Word menu and select “Preferences.”
Step 2: Customize the Ribbon
Within the “Word Preferences” window, navigate to the “Ribbon & Toolbar” section. Here, you’ll find the option to enable the “Developer” tab. Check the box next to it and confirm your choice by clicking “OK.”
Step 3: Compose Your List
With the Developer tab now accessible, proceed to type out your checklist.
Step 4: Incorporate Check Boxes
Position the cursor at the beginning of the first item on your list. In the Developer tab, select the “Check Box” option.
A check box will appear adjacent to the selected item. To toggle the status of the check box, click it and navigate to the “Options” in the Developer tab. In the ensuing pop-up window, select “Checked” to mark it and “Not Checked” to unmark it. Confirm your selection by clicking “OK.”

Final Thoughts
In this tutorial, we’ve explored two different methods for adding checkboxes in Word documents. The first method is ideal for static checkboxes in printed documents, while the second method allows you to create functional checkboxes within Word files. Choose the method that best suits your needs and enhance the usability of your Word documents today.
For more tips and tricks related to Microsoft Office and other productivity tools, feel free to explore our extensive collection of tutorials. We’re here to help you make the most of your digital workspace.