In the digital age, our iPhones are more than just phones – they’re our personal assistants, alarm clocks, and entertainment systems all rolled into one. But with all these features comes a barrage of notifications that can be overwhelming. If you’re looking for a way to silence these notifications, you’ve come to the right place.
Understanding iPhone Notifications
What are iPhone Notifications?
iPhone notifications are alerts that pop up on your screen to inform you about various activities on your device. These could be messages, emails, app updates, or even reminders.
Why Silence Notifications?
While notifications can be helpful, they can also be distracting, especially when you’re trying to focus on work or enjoy some quiet time. By silencing notifications, you can control when and how you receive these alerts.
How to Silence Notifications
Step 1: Open Settings
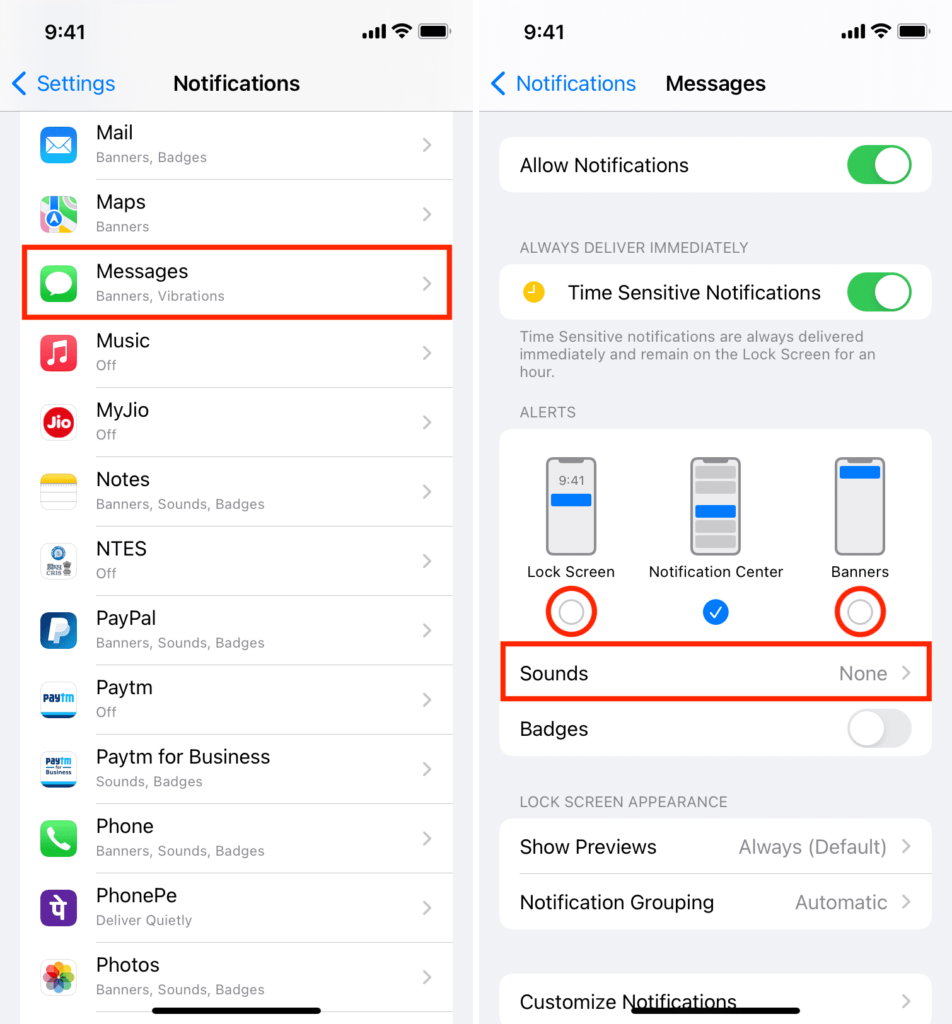
Go to your iPhone’s home screen and tap on the “Settings” icon.
Step 2: Tap on “Notifications”
You’ll find this option in the settings menu.
Step 3: Select the App
Choose the app for which you want to silence notifications.
Step 4: Disable Notifications
Toggle off the “Allow Notifications” switch.
By following these steps, you can enjoy a distraction-free experience on your iPhone.
Advanced Notification Settings
If you want more control over your notifications, consider exploring these advanced settings:
- Notification Previews: This setting allows you to choose when notification previews should appear.
- Sounds: You can turn off notification sounds here.
- Badge App Icon: This setting controls whether or not a red badge with the notification count appears on the app icon.
Troubleshooting Common Issues
If you’re facing issues with your iPhone notifications, check out our troubleshooting guides:
- How to Fix – iMessage Signed Out Error on iPhone
- iPhone: Enable or Disable Caller ID
- How to Turn Off Apple Maps Suggestions
- How to Fix iPhone “SOS Only” Network Issue: Troubleshooting Guide
Remember, silencing notifications is about taking control of your digital experience. So go ahead and customize your settings as per your needs!
Advanced Notification Settings
Notification Previews
This setting allows you to choose when notification previews should appear. You can set it to always show, never show, or only show when unlocked.
Sounds
You can turn off notification sounds here. This is particularly useful if you’re in a meeting or a quiet place and don’t want to disturb others.
Badge App Icon
This setting controls whether or not a red badge with the notification count appears on the app icon. If you find this distracting, you can easily turn it off.
Troubleshooting Common Issues
Sometimes, despite correctly setting up your notifications, they might not work as expected. Here are some common issues and how to fix them:
Issue 1: Notifications Not Working
If your iPhone notifications are not working as expected, check whether you’ve set them up correctly. Sometimes, an app may never request the required permission causing them to not appear.
Issue 2: Focus or Do Not Disturb Mode Interferes with Notifications
Focus mode can interfere with notification delivery. Make sure to turn them off if you want to receive all notifications.
Issue 3: Notification Summary Enabled
Notification Summary bundles together “non-urgent” notifications and delivers them as a summary at more convenient times of your choosing. You won’t see certain notifications immediately with this mode enabled.
Issue 4: App-Specific Issues
Sometimes, the issue might be with a specific app. For instance, if you’re using the default Mail app for iOS, you won’t get push notifications for a standard Gmail account. In such cases, switching to the Gmail iPhone app can resolve the issue.
Remember, if you’re facing issues with your iPhone notifications, check out our troubleshooting guides:
- How to Fix – iMessage Signed Out Error on iPhone
- iPhone: Enable or Disable Caller ID
- How to Turn Off Apple Maps Suggestions
- How to Fix iPhone “SOS Only” Network Issue: Troubleshooting Guide
With these tips and tricks at your disposal, managing your iPhone notifications should be a breeze! Remember, it’s all about creating a digital experience that works best for you.
