In this comprehensive guide, we’ll delve into the common problem many Mac users encounter – the greyed-out elements in Disk Utility. If your partition, hard drive, or Disk Utility’s own tools are showing the dreaded greyed-out appearance, it’s a clear sign that something’s not quite right. But fret not, we’re here to provide you with detailed solutions, step-by-step instructions, and valuable tips to get your Mac back on track. Let’s dive into it.
How to Avoid Losing Your Data When Fixing Greyed-Out Partition
Before we begin troubleshooting, it’s essential to stress the importance of securing your data. Several solutions may eventually lead to data loss, such as formatting. This advice is particularly crucial if you have important data on the partition that you wish to preserve.
One way to safeguard your data is by using data recovery software. Even when your Mac’s file system is greyed out or behaving oddly, this tool can help you access and extract your data seamlessly. In this article, we’ll demonstrate the process using Disk Drill, a Mac-optimized application known for its effectiveness even in situations where Disk Utility may falter.
Here are the steps to follow:
Step 1: Download and install Disk Drill, then launch it from the Finder > Applications folder.
Step 2: Scan your drive. Disk Drill can recognize and scan partitions that are greyed out in Finder.
Step 3: Select the files you lost while formatting your drive and click Recover. To prevent overwriting, save your data to a separate drive.
Now, let’s move on to solving the greyed-out elements in Disk Utility.
Common Fixes for Greyed Out Elements in Disk Utility
Case #1: Partition is Greyed Out
When your Disk Utility partition appears greyed out on the left sidebar, it indicates that it hasn’t been mounted. This can occur if macOS’s mounting system was interrupted due to a lack of CPU resources. To address this, follow these steps:
- Launch Disk Utility (Finder > Applications > Utilities).
- Select your partition from the left sidebar.
- Click the Mount button.
If it doesn’t work initially, try restarting your Mac and attempt to mount the partition again.
Case #2: Mount Button is Greyed Out
When the Mount button is greyed out in Disk Utility, there are two potential reasons. Firstly, you might have inadvertently selected a non-partition drive. If that’s not the case, the partition’s file format may be incompatible with macOS. To resolve this, you’ll need to format it to a Mac-compatible file system (e.g., APFS or HFS+) using Disk Utility’s Erase tool.
Case #3: Volume +- Option is Greyed Out
The Volume +- button allows users to create “volumes” on a drive, which are resizable versions of partitions. However, this tool is exclusively available for APFS partitions. If it’s greyed out, you’re likely using a different file system (e.g., HFS+, exFAT, FAT32, or NTFS) for which the tool is unavailable. To create a volume, you’ll need to format your drive to APFS.
Case #4: Partitioning Function is Greyed Out
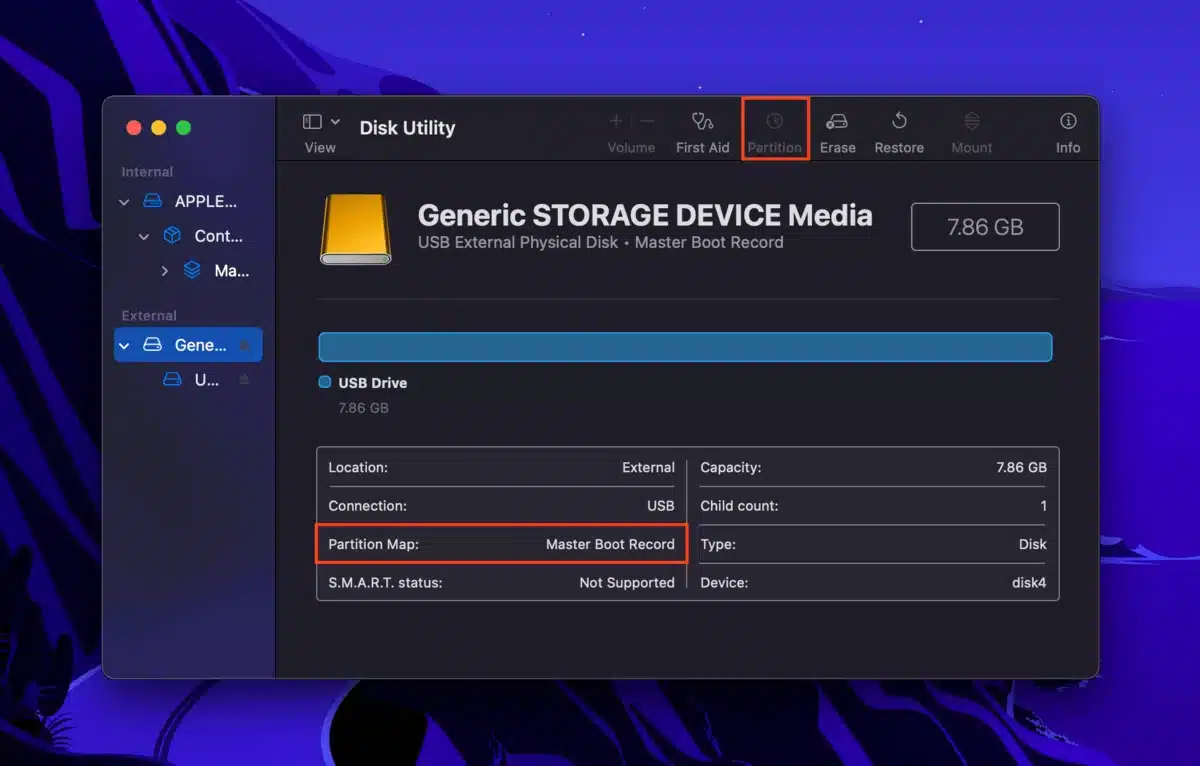
If you’re unable to partition your hard drive on your Mac because the Partition button in Disk Utility is greyed out, it might be related to the drive’s formatting. In this case, you may be attempting to partition a drive with the MBR (Master Boot Record) Scheme. To fix this, follow these steps:
- Format your drive and choose GUID Partition Map as the Scheme (see Case #2 for instructions and warnings).
Another situation where “Disk Utility won’t let me partition” occurs is when the drive being partitioned is at full capacity. In this case, the Partition button isn’t greyed out, but Disk Utility will offer to partition your drive at the expense of erasing your data.
Case #5: Erase, Restore, Unmount Buttons Are Greyed Out
The Erase, Restore, and Unmount Buttons are only available for non-system internal and external drives and partitions to protect users from affecting macOS. If Erase is grayed out in Disk Utility (or Restore or Unmount), you’ve likely selected your system drive or partition, which is currently running macOS. To resolve this, select a non-system drive from Disk Utility’s sidebar.
Case #6: First Aid is Greyed Out in Recovery Mode for System Drive
When the First Aid button is greyed out in Disk Utility while selecting your partition, the partition map (which defines how your data is organized) is likely corrupted. To fix it, run the First Aid tool on your entire drive instead.
Conclusion
A greyed-out partition in Disk Utility can be caused by various factors, including user error, corruption, or the natural lifespan of a drive. Thankfully, there are usually solutions for these issues, as we’ve covered in this article. However, the best practice is to create routine backups using Time Machine. Without vigilant monitoring of your drives, Time Machine backups are the best way to secure your data before it’s too late.
FAQ
Q1: Can Disk Utility repair a greyed-out partition? A1: Yes, Disk Utility can repair some greyed-out partitions. However, the extent of repair depends on the specific issue causing the greyed-out state.
Q2: What should I do if Disk Utility’s First Aid fails to repair a greyed-out partition? A2: If Disk Utility’s First Aid is unsuccessful, consider using third-party disk repair software for a more thorough repair attempt.
Q3: Will mounting a greyed-out partition cause data loss? A3: Mounting a greyed-out partition should not result in data loss, as it merely makes the partition accessible. However, be cautious when performing other actions in Disk Utility.
Q4: How can I check if my drive’s file system is compatible with macOS? A4: You can check the file system of your drive in Disk Utility. If it’s incompatible, you may need to format the drive to a Mac-compatible file system.
Q5: Does Disk Drill work with all versions of macOS? A5: Disk Drill is optimized for Mac and works with various macOS versions. Ensure you use a compatible version for your operating system.
Q6: Can I use Disk Drill for data recovery on external drives too? A6: Yes, Disk Drill can be used for data recovery on external drives, making it versatile for different data recovery needs.
Q7: Is it possible to create backups with Time Machine even when a partition is greyed out? A7: Time Machine backups can be created as long as the drive is accessible. If a partition is greyed out, focus on resolving that issue first.
Q8: Are there alternatives to Disk Drill for data recovery on Mac? A8: Yes, there are alternative data recovery software options for Mac, such as Data Rescue, Stellar Data Recovery, and more. Choose one that suits your needs.
Q9: Can I use Disk Utility to change the file system of a drive without losing data? A9: Yes, Disk Utility can reformat a drive with a different file system. However, this process typically involves erasing the drive, so back up your data first.
Q10: How often should I perform backups with Time Machine? A10: It’s advisable to perform regular backups with Time Machine, such as daily or weekly, to ensure your data is consistently protected.