In today’s digital age, where virtual communication has become the norm, a functioning microphone on your Mac is crucial. Whether you’re joining a video conference, recording a podcast, or simply making a voice call, ensuring your microphone is working optimally is essential. Fortunately, macOS makes it relatively easy to set up and check your mic. In this comprehensive guide, we will walk you through the steps to check your mic on a Mac, ensuring that it’s ready to capture your voice clearly.
Method 1: System Preferences for Mic
The System Preferences option provides an easy and built-in way to test your microphone on a Mac. Follow these steps: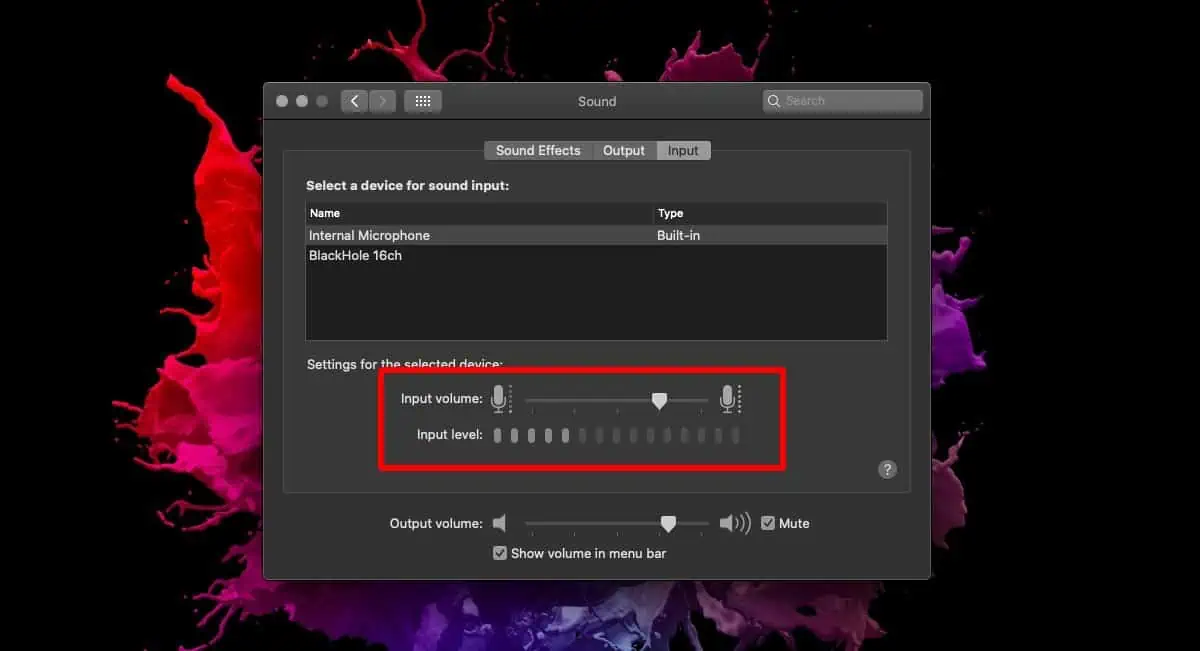
- Connect Your External Mic: If you’re using an external microphone, make sure it’s properly connected to your Mac.
- Open System Preferences: Click on the Apple logo in the top-left corner of your screen and select “System Preferences” from the dropdown menu.
- Access Sound Preferences: In the System Preferences window, find and click on the “Sound” icon.
- Navigate to Input Tab: Within the Sound preferences, go to the “Input” tab. This is where you can manage your microphone settings.
- Select Your Mic: From the list of input devices, choose the microphone you want to test.
- Adjust Volume: Adjust the volume slider to an appropriate level, ensuring that it captures the sound you want the microphone to pick up. Speak into the microphone during this process.
- Observe Input Bars: Below the input device selection, you will see bars that light up to indicate detected input. If they remain inactive while you speak, it means your microphone is not detecting any input.
Method 2: Browser-Based Mic Test
If your microphone appears to be working in System Preferences but is not functioning properly in specific applications, it might be due to permission or app-related issues. To diagnose and resolve this, follow these steps: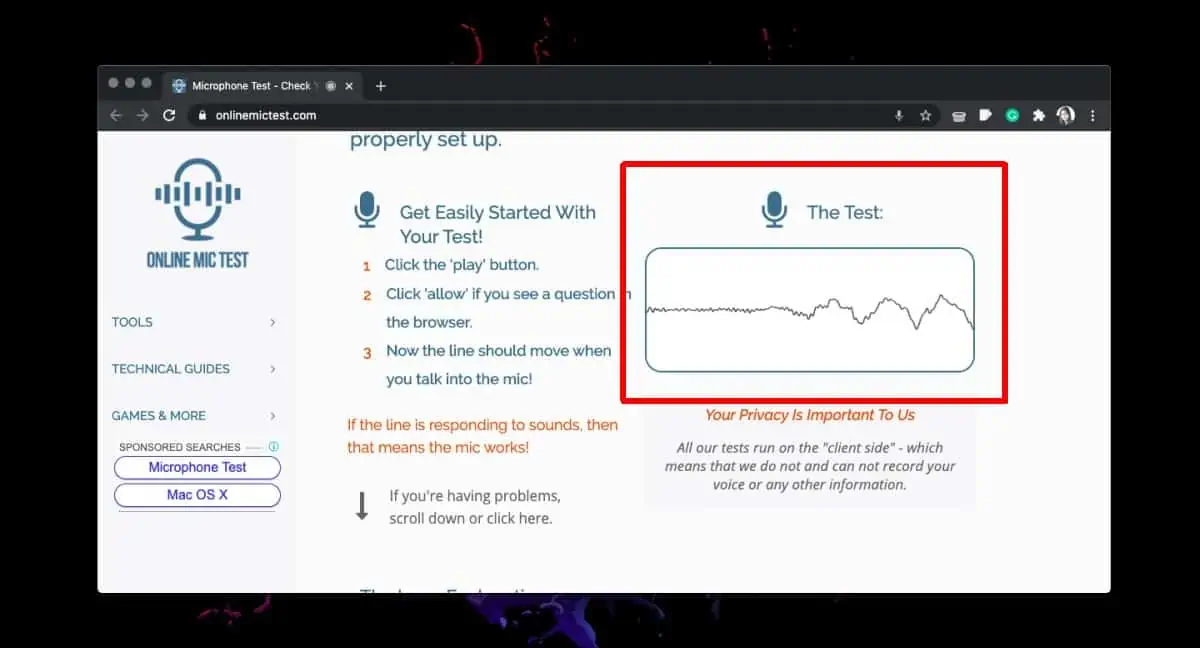
- Open Your Web Browser: Launch your preferred web browser.
- Visit the Microphone Test App: Navigate to the Microphone test app.
- Initiate the Test: Look for a “Play” button or a similar indication on the webpage and click on it.
- Permission Request: Your browser will ask for permission to access your microphone. Allow the browser access to proceed with the test.
- Speak into the Mic: Once granted access, speak into your microphone. A visual indicator on the webpage will change to reflect the volume of the sound being captured.
Conclusion
In conclusion, while macOS offers built-in tools for checking your microphone, dedicated mic testing apps are not as common. If you’re looking for more advanced options or want to monitor your microphone live, you can consider downloading third-party software like Audacity, which provides extensive control over your microphone settings.
Ensuring your microphone functions correctly is essential for a seamless digital experience, and with these methods, you can quickly diagnose and resolve any issues that may arise. So, whether you’re engaging in online meetings, recording your voice, or experimenting with audio projects, your Mac’s microphone will be ready to deliver exceptional sound quality.
Now, let’s address some common questions related to mic testing on Mac.
Frequently Asked Questions
1. Why is my Mac not detecting my external microphone?
- If your Mac is not detecting the external microphone, check the connection and ensure the microphone is compatible with your Mac model. You may also need to check the microphone settings in System Preferences.
2. Can I use the built-in microphone and an external microphone simultaneously on my Mac?
- Yes, macOS allows you to use both the built-in microphone and an external microphone simultaneously. You can select the desired input device in the Sound preferences.
3. Are there any recommended third-party mic testing apps for Mac?
- While mic testing apps for macOS are limited, some third-party applications like Audacity and GarageBand offer advanced microphone testing and control features.
4. How can I improve the audio quality of my microphone on Mac?
- To enhance microphone audio quality, consider using an external microphone with noise-canceling features, adjusting input levels in System Preferences, and using audio editing software for post-processing.
5. What should I do if my browser-based mic test indicates no sound input?
- If the browser-based test shows no sound input, double-check your browser’s microphone permissions and ensure that no other applications are using the microphone simultaneously.
6. Can I test my Mac’s microphone with voice recognition software?
- Yes, voice recognition software like Siri or dictation services can be used to test your Mac’s microphone by giving voice commands or dictating text.
7. Is it possible to troubleshoot microphone issues on a Mac by resetting audio settings?
- Yes, you can troubleshoot microphone problems on your Mac by resetting audio settings in System Preferences > Sound > Input. However, be cautious, as this may affect other audio settings as well.
8. What should I do if my microphone is picking up background noise?
- To reduce background noise, consider adjusting microphone sensitivity in System Preferences and using noise-canceling software or hardware.
9. Can I use a USB microphone on my Mac?
- Yes, USB microphones are compatible with Mac computers and are often used for recording high-quality audio for various purposes.
10. Are there any recommended settings for optimal microphone performance on Mac? – Optimal settings may vary depending on your specific microphone and intended use. Experiment with microphone input levels in System Preferences to find the best configuration for your needs.