If you are a true music lover, the ViPER4Android app is a must for you. With ViPER4Android you can incredibly boost your Android Sound system. ViPER4Android is the most famous sound mod for Android devices. Today we prepared guide which will help you to install ViPER4Android on your smartphones running Android Android Nougat 7.0 & 7.1 and Oreo 8.0/8.1.
ViPER4Android Features
ViPER4Android is one of the oldest music mods. With this Custom Mod, a user can take the full inbuilt advantage of Audio System on his Android devices. It increases the device potential and may offer you some cool equalizer options. If you’re new to the whole scene, you would first want to look at the different sound modifications that
ViPER4Android offers.
Playback Control: Control the output audio volume of Android by amplifying or decreasing it.
FET Compressor: Limits the FET circuits in Android to avoid any damage to audio hardware.
Viper-DDC: Pre-defined profiles for an extensive list of supported headphones to get the most out of them.
FIREqualizer: 10-band FIR (Finite Impulse Response) filter equalizer for refined control over every audio tone.
Viper Bass: Get the best control over Bass by customizing the frequency and using different modes – Natural, Pure Bass+ and Subwoofer.
Viper Clarity: Balance out the heavy bass and clear audio while listening to music.
These were some of the features that are implemented in ViPER4Android.

Software info:
- Version: FX version 2.5.0.5 (active) / XHiFi version 2.1.0.2-1 (discontinued)
- Codename: (FX version) Beautiful / (XHiFi version) X-Factor
- Compiled date: September 1, 2016 / September 4, 2013 – Official Release
- Operating environment: Android 2.3 / 4.0 / 4.1 / 4.2 / 4.3 / 4.4 / 5.0 / 6.0 / 7.0/ 8.0
- CPU platforms: ARM (ARM CortexA8 or higher), x86 (Atom/i3/i5/i7)
- Language: English (US) / Simplified Chinese / Traditional Chinese / more
How To Install ViPER4Android On Android Nougat 7.0 & 7.1
- Download the official ViPER4Android for Nougat (FX 2.5.0.5): Link
- Extract the downloaded zip and it will contain two APKs –
- ViPER4Android_FX_v2505_A4.x-A7.x.apk
- ViPER4Android_FX_v2505_A7.x_Nougat_IO_test_fix.apk
- Since we are going to install ViPER4Androi on Nougat here, we will just need the “ViPER4Android_FX_v2505_A7.x_Nougat_IO_test_fix.apk” file.
- If you have downloaded it to your PC instead, just transfer the APK to your phone’s storage.
- Before we head to the installation, open the root file explorer and grant it root permissions when prompted. Navigate the root/system storage and go to “/vendor/etc”.
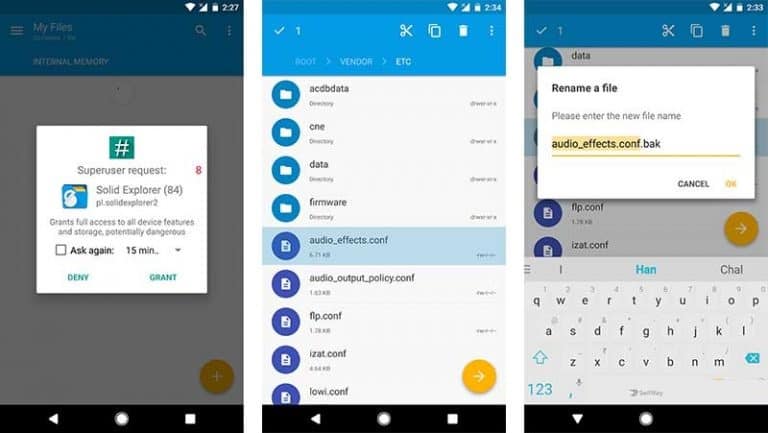
- You shall see a file named “audio_effects.conf”. Rename that file to “audio_effects.conf.bak“. While you can also delete the file, but we prefer renaming and keeping it, if we require it in future.
- Open root file manager and browse to the location where the APK is present. Copy the “ViPER4Android_FX_v2505_A7.x_Nougat_IO_test_fix.apk” file and move it to /system/priv-app.
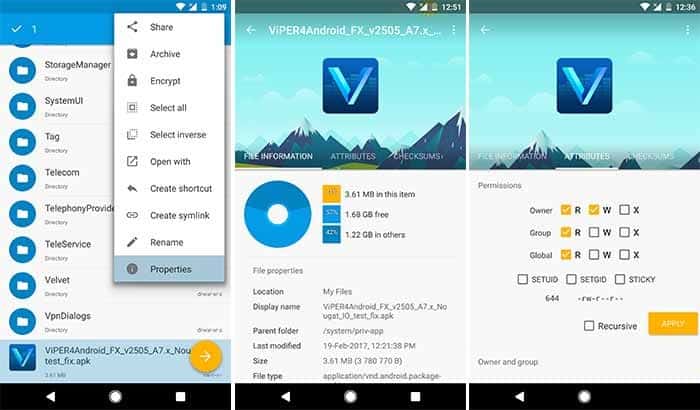
- We are not done yet. Long-press the file, tap on the 3-dot overflow button, and select Properties. Go to the ATTRIBUTES tab, set its permission to -rw-r–r–, and select APPLY.
- Reboot your device now.
- Now go to the app drawer and run the ViPER4Android FX app. When you are asked for storage permissions, make sure to grant them.
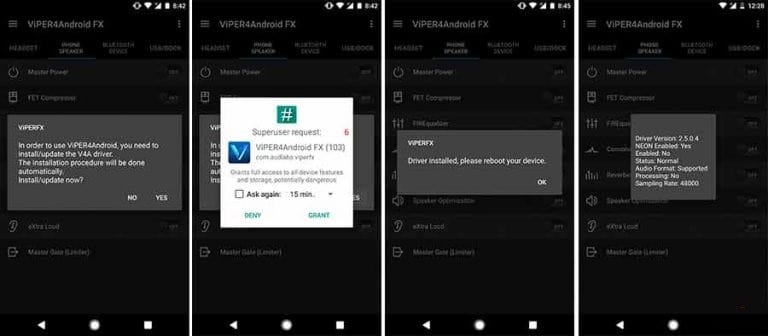
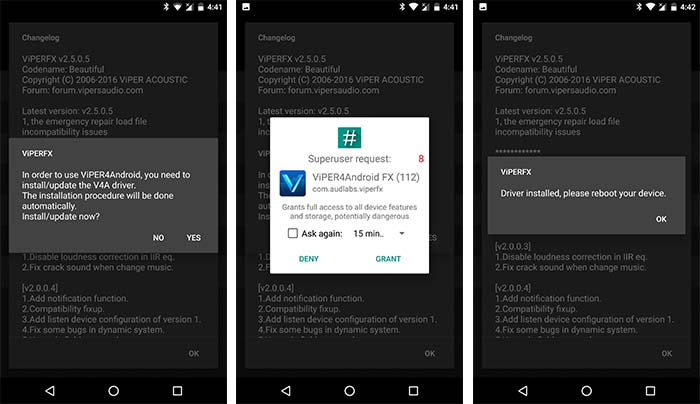
- A prompt will display for driver installation. The last thing to do to install ViPER4Android on Nougat is to select “Yes” to confirm the driver installation process. You will also need to allow Superuser permissions to the app.
- Your phone’s screen may freeze, don’t worry just wait and do not exit the app. When the installation is successful, you will get a message. Tap OK and reboot your device.
- Yeah! You have just installed ViPER4Android on Nougat.
When your device reboots, you will have completely functional ViPER4Android on Nougat. This was simple, wasn’t it? If you have trouble in driver installation, read the troubleshooting section below or comment right away.
How to Install ViPER4Android on Android Oreo
Now that you have properly setup your Android device to install ViPER4Android on Android Oreo, follow the steps below.
- Download ViPER4Android for Android Oreo: ViPER4Android_FX_v2505.zip
- Extract the downloaded file. You shall then have two files:
- ViPER4Android_FX_v2505_A4.x-A7.x.apk
- ViPER4Android_FX_v2505_A7.x_Nougat_IO_test_fix.apk
- We are only going to need the latter (ViPER4Android_FX_v2505_A7.x_Nougat_IO_test_fix.apk).
- Connect your device to the PC and transfer the file to it.
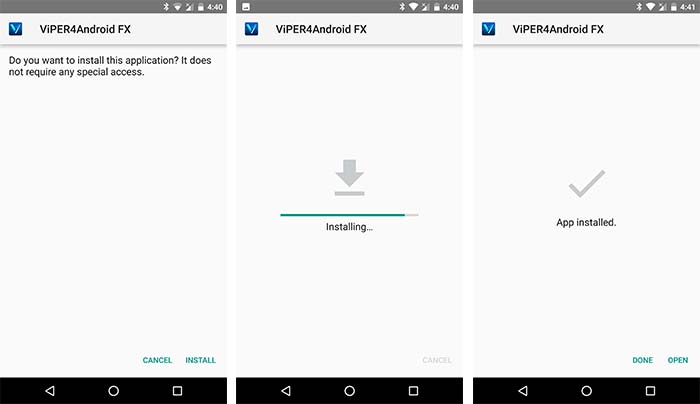
Install ViPER4Android on Android Oreo – Install ViPER4Android app - Now open Solid Explorer (Or any other file explorer). Navigate to the location where you placed the *.apk file and install it.
- Once installed, go to the app drawer and tap on “ViPER4Android”.
- As soon as the app is launched, it will prompt you for driver installation.
- Just tap on “YES”. You shall instantly be asked for root permissions, so grant them.
Install ViPER4Android on Android Oreo – Driver Installation - The driver installation will begin and your phone’s screen will freeze. Don’t worry, it’s going as planned. Do not exit the app or press any buttons.
- After 30-60 seconds the process will complete. Simply tap on “OK” and reboot your device.
Once your phone has rebooted, open the V4A app again and swipe out from the left to open the menu.
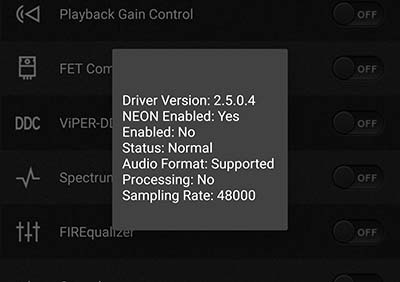
Select “Driver Status”. It should display the status value as “Normal”. You are now ready to give a nice push to your phone’s audio experience by customizing settings in the ViPER4Android app. Great, you have succeeded to install ViPER4Android on Android Oreo.
Troubleshooting
If your driver installation has failed while installing ViPER4Android on Nougat and Oreo, then there could be few reasons behind it. Follow the simple steps below and check if anything helps.
- Getting “Driver install failed: I/O error, please reboot and try again”? Then read step #6.
- Uninstall the current busybox and switch to a different app to install busybox on your Android.
- The most reliable and widely used method to root and manage permissions is SuperSU. If you’re using any other root method, uninstall that and opt for SuperSU.
- Driver installation was successful, but V4A is still not working? The most common reason behind this is that your device may have other sound mods or tweaks installed. Disable them and completely remove them if possible.
- On some devices, you may require changing your SELinux status from “Enforcing” to “Permissive”.
- If nothing above has worked for you, then you may try switching to a different ROM as your last resort.
- If you still have problems, comment below and don’t forget to mention your device model, ROM, and Android version.