In today’s digital age, our smartphones have become an extension of ourselves. Whether you’re a DIY enthusiast, a tech aficionado, or simply an avid reader, your iPhone is likely an essential tool in your daily life. However, one common frustration that many iPhone users face is the automatic screen timeout feature, also known as Auto-Lock. In this comprehensive guide, we will delve into the intricacies of the Auto-Lock feature on your iPhone, provide simple steps to adjust its settings, offer proven methods to prevent your screen from automatically turning off, and troubleshoot common issues. By the end of this article, you’ll have the knowledge and tools to take control of your iPhone’s screen timeout settings and enhance your overall user experience.

Understanding the Auto-Lock Feature on Your iPhone: A Comprehensive Guide
The Auto-Lock feature on your iPhone is designed to conserve battery life and prevent accidental screen taps when your device is not in use. By default, the Auto-Lock setting is set to turn off your screen after a certain period of inactivity. However, this default setting may not always align with your preferences or needs. Understanding how the Auto-Lock feature works is crucial in customizing it to suit your requirements.
Also read: How to turn off do not disturb on iPhone
To access the Auto-Lock settings on your iPhone, navigate to “Settings” and tap on “Display & Brightness.” From there, select “Auto-Lock” to view the available options. The default options typically include “30 Seconds,” “1 Minute,” “2 Minutes,” “3 Minutes,” “4 Minutes,” and “5 Minutes.” These options determine the duration of inactivity before your iPhone screen automatically turns off.
Simple Steps to Adjusting Auto-Lock Settings on Your iPhone
Now that you understand the basics of the Auto-Lock feature, let’s explore how you can adjust its settings to better suit your needs. Follow these simple steps to customize the Auto-Lock duration on your iPhone:
1. Open the “Settings” app on your iPhone.
2. Scroll down and tap on “Display & Brightness.”
3. Select “Auto-Lock” from the list of options.
4. Choose your preferred Auto-Lock duration from the available options.
5. Exit the settings menu, and your new Auto-Lock duration will take effect immediately.

Proven Methods to Prevent Your iPhone Screen from Automatically Turning Off
While adjusting the Auto-Lock duration is a straightforward solution, there are additional methods you can employ to prevent your iPhone screen from automatically turning off. These methods offer more flexibility and control over your device’s screen timeout settings. Here are a few proven methods to consider:
1. Use the “Keep Screen On” feature in specific apps: Some apps, such as video players or navigation apps, have a built-in feature that allows you to keep the screen on while using them. Look for this option within the app’s settings or preferences.
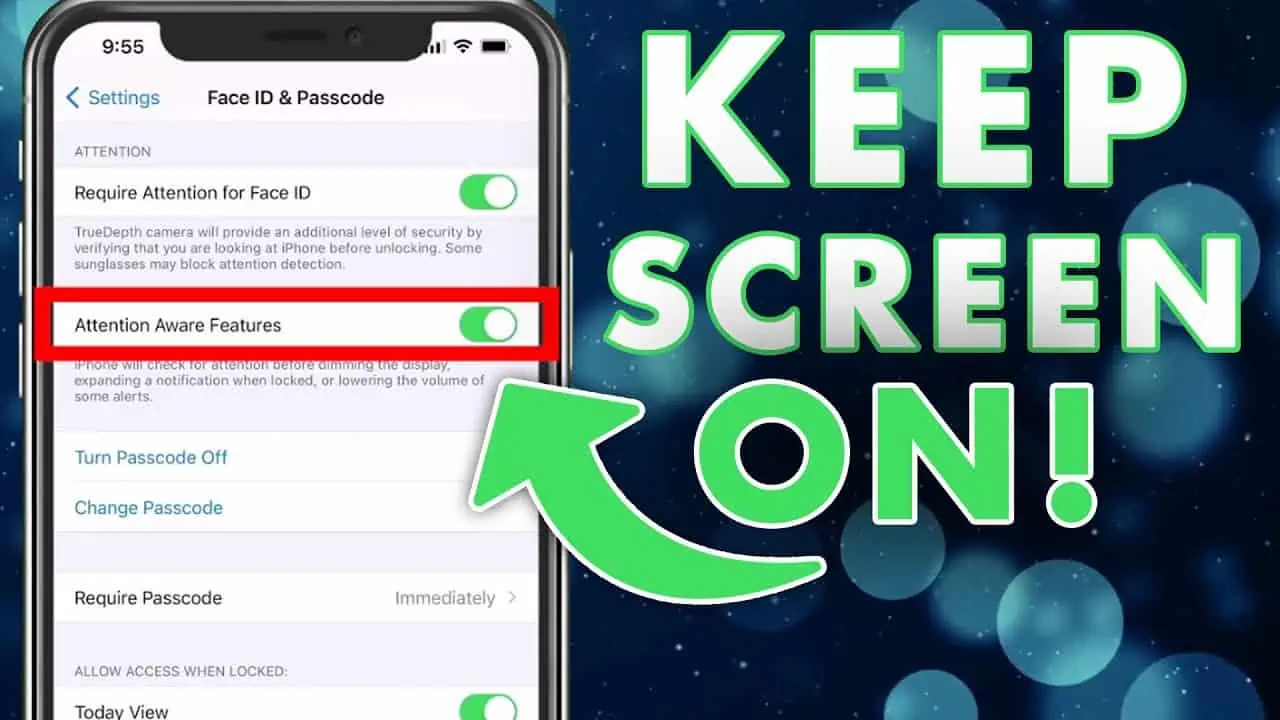
2. Utilize AssistiveTouch: AssistiveTouch is a powerful accessibility feature on your iPhone that can help prevent your screen from turning off. To enable AssistiveTouch, go to “Settings,” tap on “Accessibility,” and select “Touch.” From there, toggle on “AssistiveTouch.” Once enabled, you can tap the AssistiveTouch icon on your screen and select “Device” > “Lock Screen” to keep your screen on.
3. Enable Guided Access: Guided Access is another accessibility feature that allows you to lock your iPhone to a specific app or restrict certain areas of the screen. To enable Guided Access, go to “Settings,” tap on “Accessibility,” and select “Guided Access.” Toggle on the feature and set a passcode. Once enabled, open the desired app, triple-click the home button, or the side button on newer iPhone models, and tap on “Start” to activate Guided Access and prevent your screen from turning off.
Troubleshooting Tips: What to Do When Your iPhone Screen Keeps Turning Off
Despite your best efforts, you may encounter situations where your iPhone screen continues to turn off unexpectedly. Here are some troubleshooting tips to help you resolve this issue:
1. Check your Auto-Lock settings: Ensure that your Auto-Lock duration is set to a desired value and not set to “Never.” If it is set to “Never,” your screen will not turn off automatically.
2. Restart your iPhone: Sometimes, a simple restart can resolve minor software glitches that may be causing your screen to turn off unexpectedly. Press and hold the power button until the “Slide to power off” option appears, then slide to power off. After a few seconds, press and hold the power button again until the Apple logo appears to restart your iPhone.
3. Update your iOS: Outdated software can sometimes cause unexpected issues. Check for any available software updates by going to “Settings,” tapping on “General,” and selecting “Software Update.” If an update is available, follow the on-screen instructions to install it.
4. Reset all settings: If the issue persists, you can try resetting all settings on your iPhone. This will not erase your data but will reset all personalized settings to their default values. To do this, go to “Settings,” tap on “General,” select “Reset,” and choose “Reset All Settings.” Confirm your selection and enter your passcode if prompted.
Conclusion:
In this comprehensive guide, we have explored the Auto-Lock feature on your iPhone, provided simple steps to adjust its settings, offered proven methods to prevent your screen from automatically turning off, and shared troubleshooting tips for common issues. By understanding the nuances of the Auto-Lock feature and utilizing the methods outlined, you can take control of your iPhone’s screen timeout settings and enhance your overall user experience. Remember, your iPhone is a powerful tool, and with the right settings, it can become an even more valuable asset in your daily life.