We are in a world where digitization is moving at a faster pace and inventions have taken a sudden leap. In the world of Mac Systems, things are also transforming which one can visualize from their lone Mac systems. Emails are one of the essential components in this high-tech computer world. For any operation or sending company data, emails are the one which can come handy even in the 21st century. Be it a businessman or work in an Institution, Emails are a saviour for sending those confidential messages which can be read by the other party.
But, despite Mac being one of the high-tech systems, very few know how to add a fancy email signature on Mac. This thing is a complete disaster in terms of Mac computing and email sending. Well, Apple is known for restricting their feature updates to a minimum extent. Unlike Android, they don’t give a lot more features and which is the main reason for missing of the fancy email signature.
Still, for all those fancy email signature fanatics, this guide will help you for the same. In this article, discover the deep secret to add a fancy email signature on Mac without giving a heavy blow to your pockets. Well, this is a miraculous idea, isn’t it? Yes, it is. So, let’s start to uncover this deepest secret.
Why there is a need to add a fancy email signature on Mac?
The world of today is highly customizable and in this new age world, a need of adding that extra spark of customization is vital. In terms of Email, stock ones can be one of the best but cannot signify professionalism in a broader sense. Everyone even today is stuck to those stock email texts on Mac which can be boring at times.
But, you don’t have to leave things like that. With the help of fancy email signatures, you can take it one notch higher. You can create a unique email signature for all of your MAC email accounts. At times, they can be playful, serious but can provide you with utmost benefits.
Especially in the business world, there is a need for those customizable email signatures where there is an actual handwritten signature. This, in turn, can help to authenticate any particular user in a more profound manner.
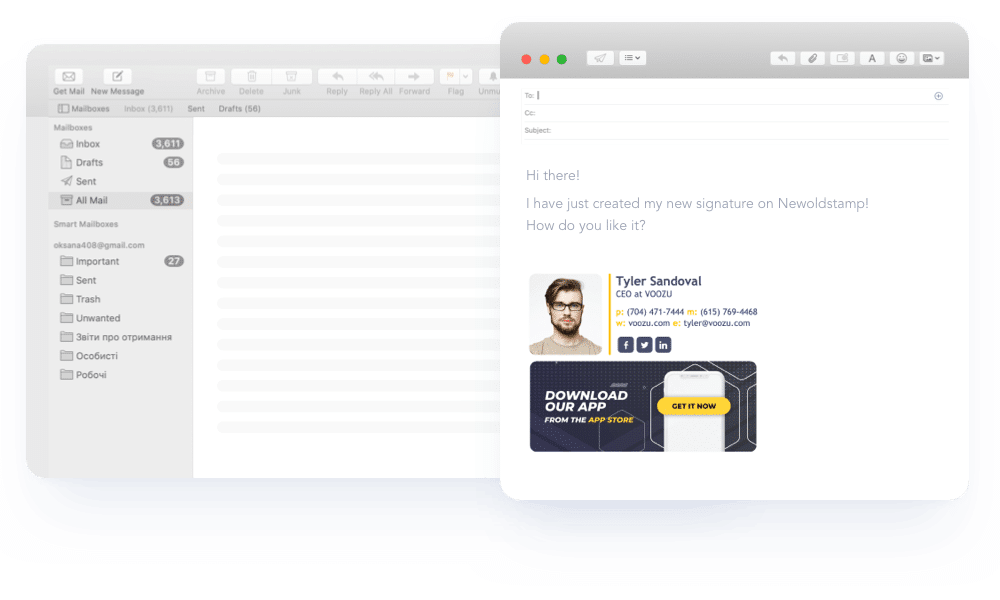
How to add a fancy email signature to Mac?
Before we start with everything, you will need the following to set up an HTML Signature on the MAC OS.
-
Mac Computer
Without this component, no one will ever think of going ahead with the process. Hence, get a Mac computer or if you already have one, install OS on it.
-
Text editing Software
For the reading as well as HTML writing of the codes, there is a necessity of good Text editing software. However, you can use the inbuilt TextEdit software since it comes out of the box in a Mac system. Other than that, Textmate can be yet another powerful option for editing purpose.
-
An HTML file coded with your desired email signature design
A prototype of your email signature is a must in this working operation. For maximum benefits, you can MYDESIGNPAD’s HTML email signature design services. Choosing them, you can create a brilliant looking signature design for you.
-
Web Server
A web server is a handy tool for hosting images which are essential in your design process.
At last, know all the norms on how to upload your images to the web server and get the appropriate image links.
Steps to add a fancy email signature to Mac
Step 1: Creation of the Placeholder Signature
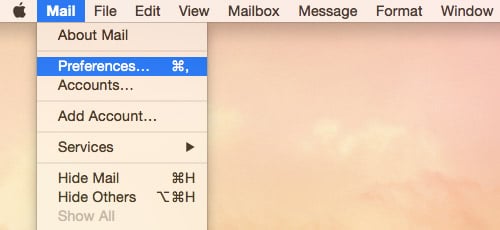
- At first, open the Mail.app
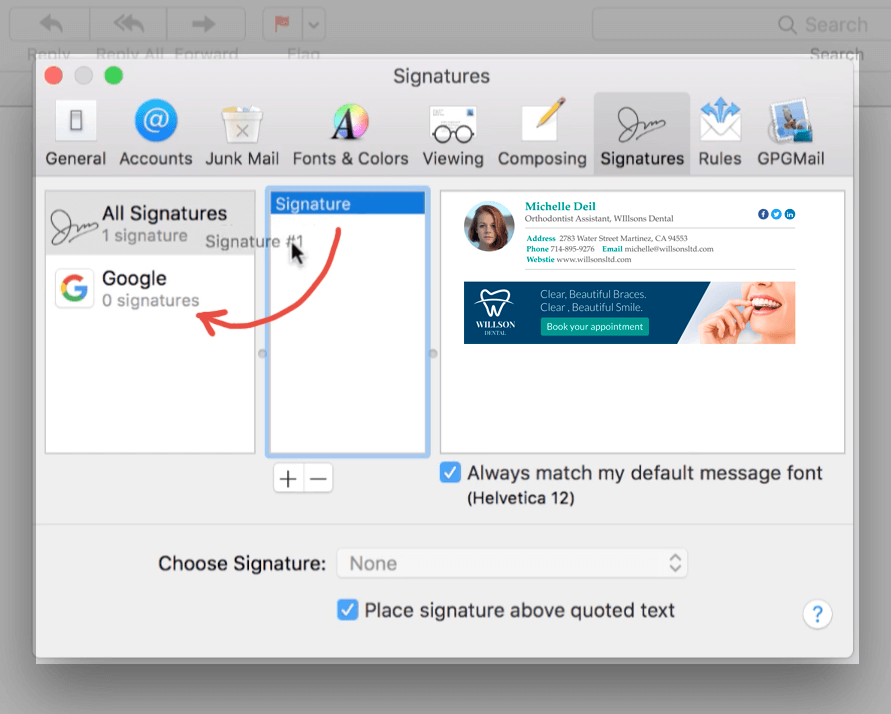
- On the main Menu and head towards the Mail Preferences. Then, click on Signatures.
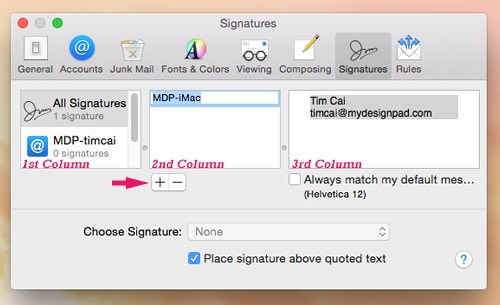
- Tap on the + icon which is present at the bottom of the 2nd column. From there add new placeholder signature and add a new name to it. For example, I am naming my signature: MDP- Johnsmith.
Step 2: Assign Signature to the Appropriate Email Account
After you have successfully done the step one, it is time to head towards step 2
- Drag the placeholder signature into the appropriate email account present on the 1st column.
- With the respective email account glowing on the 1st column, choose the placeholder signature right from the Choose Signature drop-down menu. Till now, if you are good and each thing is according to this guide, move towards Step 3.
Step 3: Check the Settings for Composing
- Get to Mail> Preferences and click on Composing.
- After the above step, make sure to select Rich Text for “Message Format”. Further, check on the other options which are shown below.
Step 4: Check Settings for Viewing
- Same as the previous step, Go to Mail> Preferences and then head towards Viewing.
- In this step, make sure to check on Load remote content in messages.
Step 5: Quite the Mail.app
After the above successful operation, you are in the halfway stage to add a fancy email signature on Mac.
In this step, make sure you do this in a correct order for an effective working of an HTML email signature.
In this step, you may click on the Command+Q to quit the mail app. In either case, you can click on Mail app then select Quit Mail internally.

Step 6: using the TextEdit.app Copy the HTML Email Signature Code
- Once you are done with your email signature, you have done an inspection on the same; it is time for the next step. In this, hold down the control keys which will help bring the pop-up menu. In either case, if you use the MYDESIGNPAD’s Email signature service, an HTML file will be given to you by mail.
- Further, click on the “Open With” and choose TextEdit.App.
- Once you see the file open, you will get to see the respective HTML code. Select all commands with (Command+A) and do the Copy operation by (Command+C).
- However in rare cases, if you spot the HTML email signature design instead of the HTML code, go to step 6B. In the Step 6B, you can display the HTML code and then can come back to step 6.
Step 6B: Set the TextEdit.app to Visualize HTML files as HTML Code
You can skip this step if you are able to see HTML code in Step 6. If not, you can follow this step.
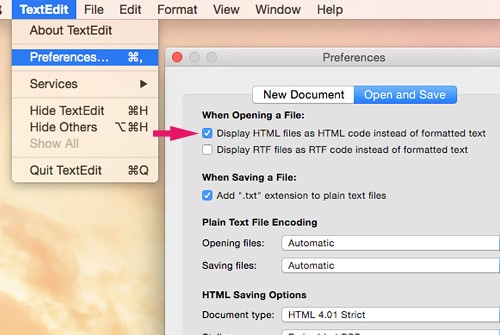
- Open the TextEdit.app.
- Go to the Main Menu, click on the preferences and tap on Open and Save.
- Now, you can check on the HTML files as HTML code instead of HTML Texts.
Step 7: Find the Placeholder Signature
- To reveal Finder, click on the Desktop.
- Go to the Main Menu, Click on Finder>Go>Library and press and hold the option key to see Library.
- In either case, if you are not using the iCloud, go to “~/Library/Mail/V3/MailData/Signatures/.”
- If you are using the iCloud, then go to
“~/Library/Mobile/Documents/com~apple~mail/Data/V3/MailData/Signatures/”
- Now, Turn on the ListView and tap on Data Modify for displaying the latest files straight at the top.
- Your placeholder will have the file extension with .mail signature and will have the most recent alter date.
Step 8: Open and Update your Signature
- Using the TextEdit.app, Open the placeholder Signature. Further, click on “Open With” and select TextEdit.
- Now, press the Command+V to paste your respective HTML email signature code as shown below.
Step 9: Lock the Signature file
These are the very important steps if you need your signature to work. However, skip this step if you are using iCloud.
- Click on the down arrow which is present on the top right of the Window.
- On the Pop-up menu, check whether is “Locked” or not.
- Quit TextEdit.
Step 10: Restart the Mail
- Open Mail App.
- Tap on the “Compose New Message” button to open a new message window.
- At this point, your new Email signature will appear automatically.
- Also, make sure to use the correct Email Signature from the drop-down menu. Well, this method can also work if you have two email signatures too and will do the trick to add a fancy email signature on Mac.
Conclusion- How to add a fancy email signature on Mac
The above process might seem to be a lengthy process but is easy and effective if you follow the instructions step by step. If you have successfully done the above steps, congratulations, you are good to go and it should be working after all the hard work.
From now onwards can use the fancy email signature in your Email and make it a lot more attractive and fancy looking. In any case, if you have any issue, re follow the above well-written instructions and all your doubts will surely disappear.
At last, you have got what you have ever wanted. Add a fancy email signature on Mac, give it a custom design and transform your email to the highest possible extent.
How to add email signature on mac
If you’re a Mac user and want to enhance your email communication with a professional touch, adding a fancy email signature can make a big difference. Fortunately, adding an email signature on Mac is a straightforward process. Follow the steps below to create a personalized and visually appealing signature that will impress your recipients.
- Step 1: Launch the Mail app on your Mac.
- Step 2: Click on the “Mail” menu in the top-left corner of the screen and select “Preferences.”
- Step 3: In the Preferences window, click on the “Signatures” tab.
- Step 4: On the left side of the window, select the email account for which you want to create a signature.
- Step 5: Click on the “+” button below the middle column to add a new signature.
- Step 6: Double-click on the newly created signature in the middle column to edit it.
- Step 7: In the right column, you can customize your signature by adding text, images, links, and formatting options.
- Step 8: Use the formatting toolbar to make your signature fancy. You can change the font, size, color, and add bold or italic styles as desired.
- Step 9: Once you’re satisfied with your signature, close the Preferences window.
- Step 10: Compose a new email to see your fancy email signature in action.
